Long-running tasks
Docker can be useful for one-off scripts like those we played with above, especially if those scripts might have hairy dependency chains (like a machine learning model assembled with a delicate balance of versioned Python libraries). A more common use of Docker, though, is for long-running tasks, like a web server or a database engine.
Let’s switch to JavaScript and make a simple web server using Express. We’ll make a new project with a barebones package.json:
{
  "name": "docker-express-example",
  "version": "1.0.0",
  "main": "server.js",
  "type": "module"
}
Then we can npm install --save express to install our server framework dependency. Let’s write some quick code to function as a web server. I’m putting this in a src subdirectory this time.
import express from 'express';

const app = express();

app.get('/', (req, res) => {
  res.status(200).send('Hello!');
});

app.listen(3000, '0.0.0.0', () => {
  console.log('Server listening');
});
And now for the Dockerfile. I’m doing a few things differently here than before, which we’ll unpack in a moment.
FROM ubuntu:22.04

WORKDIR /app

RUN apt update
RUN apt install -y nodejs npm curl

RUN npm install --global n
RUN n 20

COPY ./package.json .
COPY ./package-lock.json .

RUN npm ci

COPY ./src ./src

ENTRYPOINT ["node", "src/server.js"]
WORKDIR /app
First, you’ll notice that I’m using the WORKDIR directive. This lets us choose a directory (which will get created in the container if it doesn’t exist already) that’s used as the working directory for later commands. When we COPY files into the image, relative paths like . will be relative to this working directory. RUN and ENTRYPOINT directives also use this working directory.
RUN apt update
RUN apt install -y nodejs npm curl

RUN npm install --global n
RUN n 20
I’m installing Ubuntu’s built-in nodejs binary, but it’s not very up-to-date, so I use the n package to upgrade to Node v20. There are also official node Docker images with various Node and OS versions, if you’d like to use those as a base instead. Of course, if you need multiple dependencies in one image (e.g. both Node and Python), you may be stuck installing them manually as we do here.
COPY ./package.json .
COPY ./package-lock.json .

RUN npm ci

COPY ./src ./src
Then, we copy the dependency manager’s files package.json and package-lock.json into the image and run npm ci, which is our package manager command to install the exact dependency versions specified in package-lock.json. We do need to run npm inside the container rather than just copying our development environment’s node_modules folder into the container, because some npm packages will install differently depending on the system environment (e.g. by compiling some code for the current system with node-gyp). You may get lucky and have your development environment’s node_modules folder work just fine when copied in directly, but it’s better to avoid the potential headache of having minor incompatibilities here.
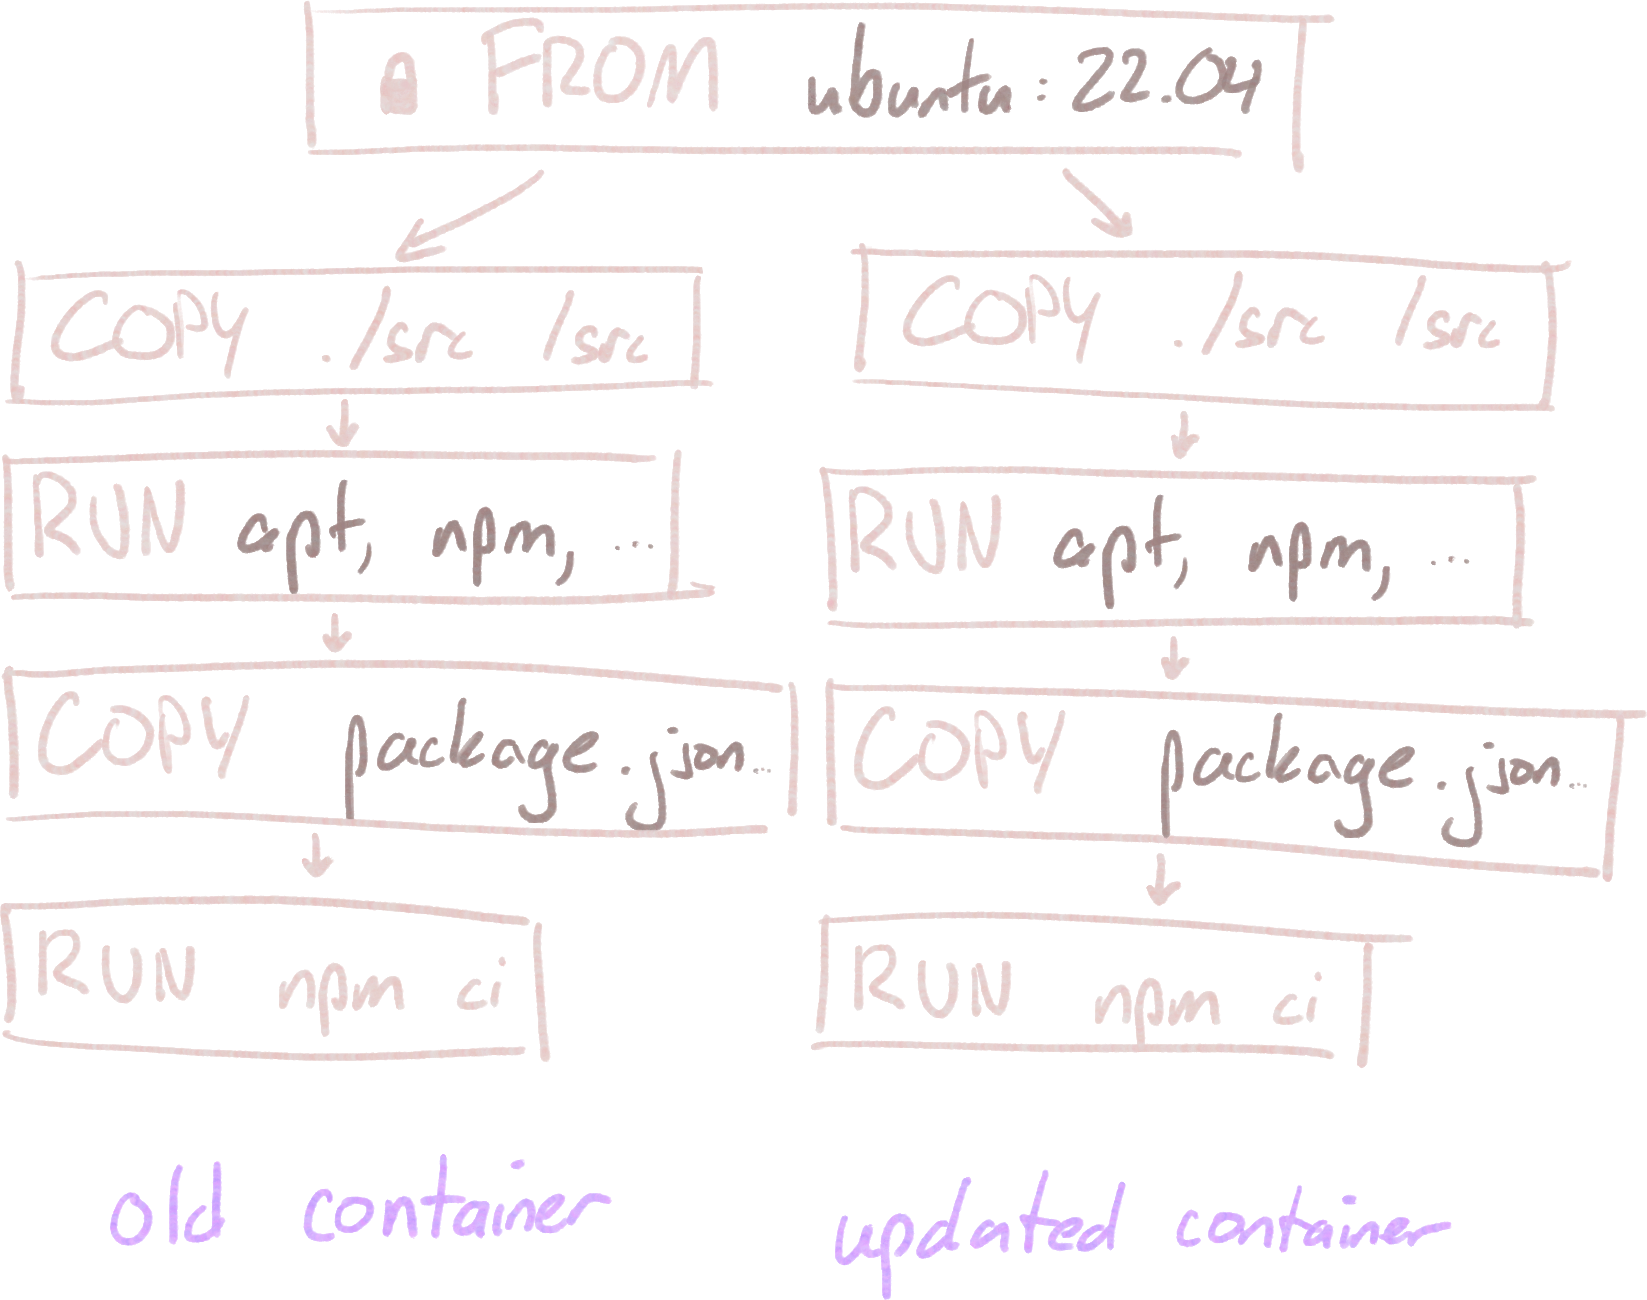
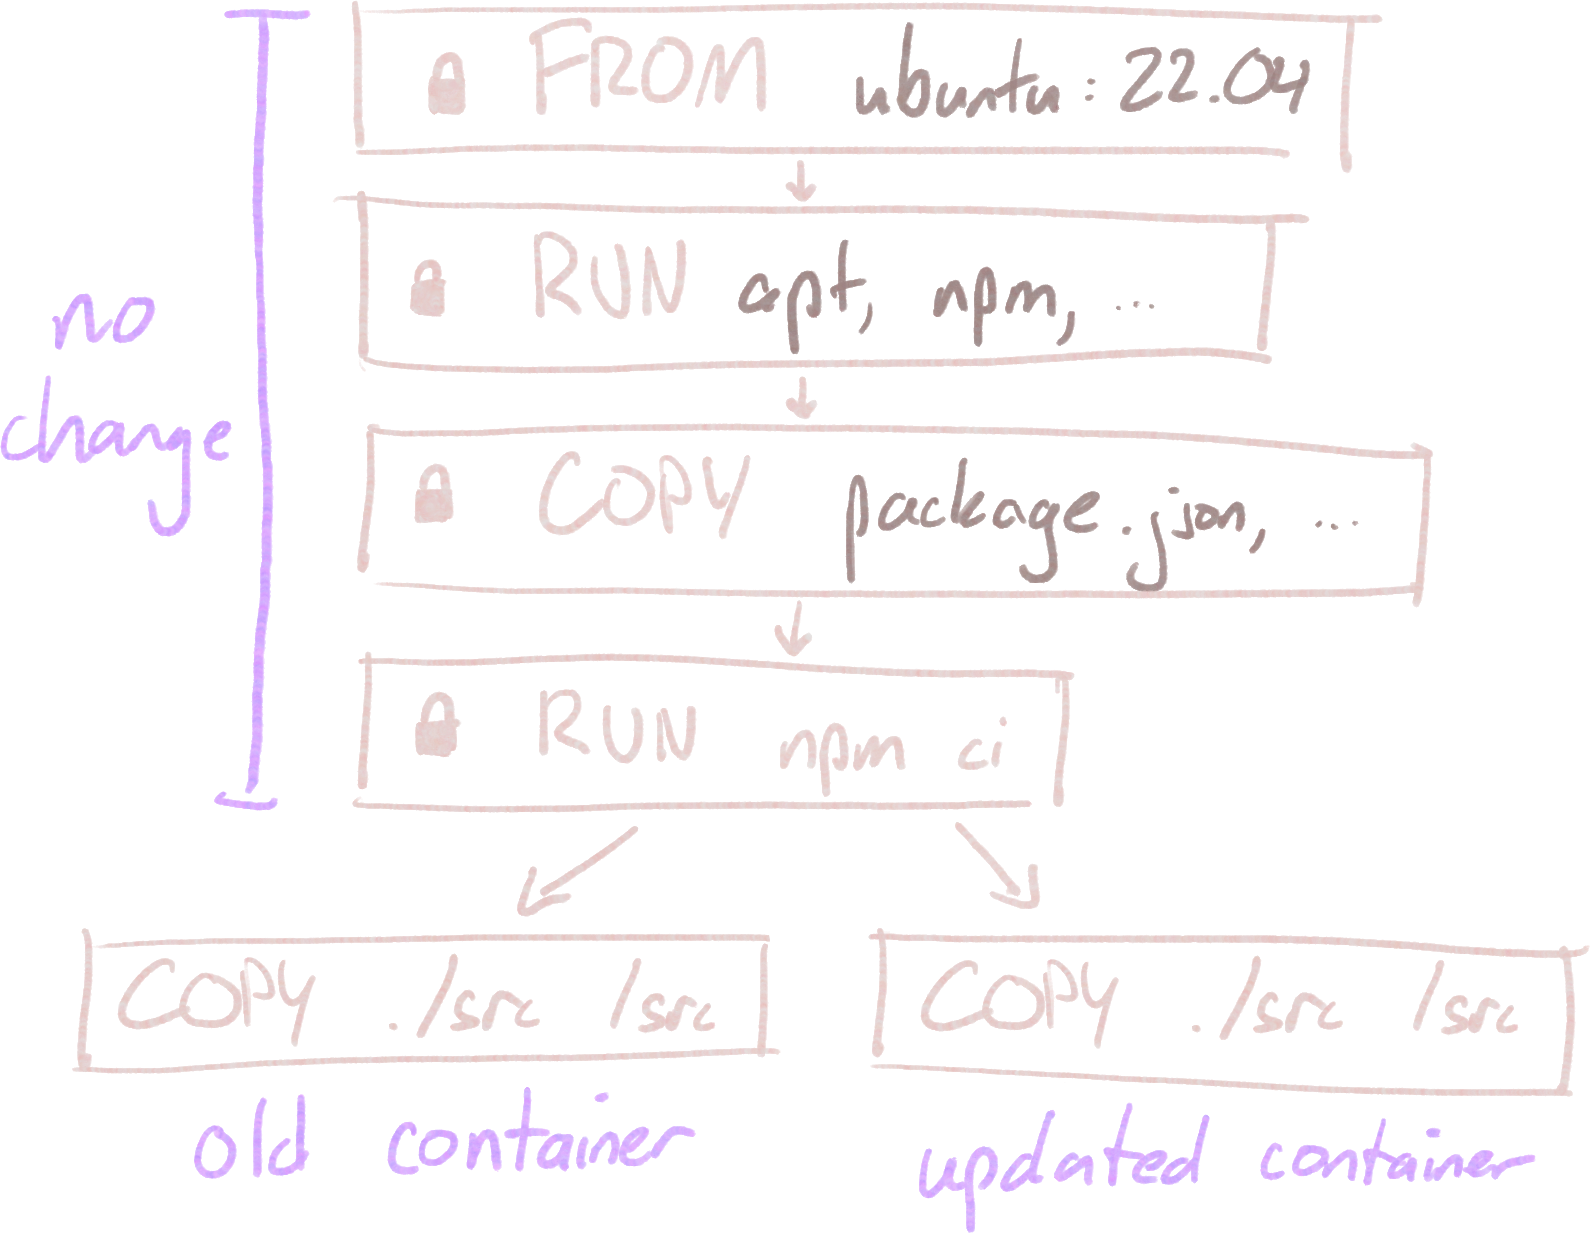
src.You’ll notice I’m copying our project files in two separate steps, deferring the src/ directory until after running npm ci. This isn’t required. We could just copy the entire project folder into the image and then run the package installer. Doing it that way would bust the build cache every time we make a change to our code, even if we haven’t installed any new dependencies, and the build process would run npm ci for every change. By separating these steps, we can avoid reinstalling dependencies with npm ci unless package.json or package-lock.json changes. This, by the way, is why I separated our app code into the src/ folder; I want to be able to easily copy our code into the container without accidentally overwriting the image’s node_modules/ folder with the copy from our development environment. There are other ways to do this, but this is an easy solution.
We can build and run this app, and it will start:
$ docker build --tag docker-express-example .

$ docker run docker-express-example
Server listening
But when we actually try to hit our server at http://localhost:3000, it doesn’t work. Our request never makes it to the server inside the container. We’ll need to tell Docker that we want to let those requests through.
Let’s kill the container with Ctrl+C.
Nope, doesn’t work. It turns out the Ctrl+C signal isn’t making its way to our software! We can kill the process through the docker commandline tool. First, we find the container ID using docker ps. This time, we don’t need that extra -a flag, because it’s okay to look at only the running containers. This sort of always-running server use case is more typical of Docker usage.
$ docker ps
CONTAINER ID   IMAGE                     COMMAND                  CREATED        STATUS                          PORTS                                           NAMES
693b48189a4a   docker-express-example    "node src/server.js"     1 second ago   Up Less than a second                                                           zen_franklin
Then, we can use docker stop 693b48189a4a (or docker kill if we’re desperate) to stop the container. If you really wanted to, you’d also be able to kill the process (with root privileges) using your normal OS process-killing tools. Remember, containerized software is still running on your host computer, not in a simulated machine.
By passing --init to docker run, we can avoid having this problem again. Make sure the argument goes before the container name, since every argument after the container name gets passed to the entrypoint command inside the container.
$ docker run --init docker-express-example
Okay, but we still have to fix the core problem: the server inside the container wasn’t actually accessible outside the container.
To solve that, we can use a port binding, which works similarly to how volumes are bound.
$ docker run --init -p 3000:3000 docker-express-example
The [host]:[container] convention remains. If we wanted to bind to a different port on the host, but have traffic route to port 3000 inside the container, we could do that too:
$ docker run --init -p 8080:3000 docker-express-example
Now, accessing http://localhost:8080 on the host machine will route us to our server running on port 3000 in the container. This can be handy if you’ve got multiple servers running on the same machine that want to bind to the same port; they’re all allowed to bind to whatever port they’d like inside the container, and you’ll just configure how those are routed when you run the container on the host.
If your container needs broader access (or you’re just too lazy to bind every port that the container might need to listen on), you can also pass --network host to the docker run command. This will bypass Docker’s typical port intermediation behavior and allow containerized applications to bind directly to the host machine’s ports. You should probably be explicit about port bindings where you can, but I’ve got a few Docker containers in my setups lurking around with host-mode networking. It’s not the end of the world.
Since Docker is useful for running these long-standing tasks like web servers, it’s nice to be able to run them in the background so that closing the terminal you used to start the application doesn’t kill the server. For that, you can use the --detach flag:
$ docker run --init -p 3000:3000 --detach docker-express-example
This will print the new container’s ID to the console and then quit. The container’s entrypoint command will still be running in the background, though, which you can see with docker ps (also notice that docker ps shows you which ports are bound on the host machine now!). If you ever want to peek at the logs of a container running this way (like you would have seen in your terminal if you hadn’t run the container in detached mode), you can use docker logs [container], passing -f if you want “follow” behavior (printing out new logs as they come in).
$ docker run --init -p 3000:3000 --detach docker-express-example
e3afc611594faa9edf4b0fcba6e7efab301ace7776e4904a0d83b9f230c0a724

$ docker ps
CONTAINER ID   IMAGE                     COMMAND                  CREATED          STATUS                                  PORTS                                           NAMES
e3afc611594f   docker-express-example    "node src/server.js"     34 seconds ago   Up 32 seconds                           0.0.0.0:3000->3000/tcp, :::3000->3000/tcp       exciting_tu

$ docker logs -f e3afc611594f
Server listening
You’re not limited to running just one command at a time inside a Docker container. One common reason to run a second command is to poke around inside a container for debugging. The docker exec command can be used to run a command inside an already-started container. Let’s use this with the -it flags (to enable interactivity) to run bash inside our started container:
$ docker exec -it e3afc611594f bash

root@e3afc611594f:/app# ls
node_modules  package-lock.json  package.json  src
root@e3afc611594f:/app#
If you want to run multiple commands all the time, though (say, to run both a web server and a database server), you’re likely better off using two distinct containers and having them communicate with one another rather than running both commands in the same container. This way, your images and dependencies won’t get tangled with each other; each image and container will have exactly what they need to run. Docker also expects your entrypoint process to be the main thing running in your container. That process’s output is where docker logs is populated from, for example. You’ll also benefit from Docker’s ability to restart crashed containers automatically, rather than having to wrangle your own solution if just one process crashes and the other stays alive.
In a moment, we’ll discuss how to use Docker Compose to handle running multiple networked containers at the same time. For now, if you’re following along, make sure to stop the container we just started.