Installing our application
These instructions will work whether you’re on Lightsail or some other Linux server.
First, let’s install Docker Engine and the Compose plugin to our server using the instructions from the Docker website (these instructions are for Ubuntu in particular, though Docker is available on plenty of other Linux distros as well). Avoid installation instructions for Docker Desktop – this is a proprietary package from the Docker corporation that you won’t need for this step.
Adding the current user to the docker group means we won’t need to use sudo every time:
$ sudo groupadd docker
$ sudo usermod -aG docker $USER
We can check that that worked by running the lightweight hello-world image from Docker Hub (personally, I had to disconnect and reconnect to the SSH server to get this to work after the above step):
$ docker run hello-world
Because our docker-compose.yml file includes a build: step, our docker compose up command is actually going to rebuild our web application’s image from the cloned ./web-app directory on the server.
The “right” way to deploy a Docker app is to build and tag our custom images first, publish them to a container repository like Docker Hub or the GitHub container registry, then pull those fully-built images down onto the production deployment server. This keeps things a little more deterministic (so that if, say, you end up needing to deploy the same thing to a second server a month from now, you don't get burned by the image being built slightly differently).
Pushing to (and pulling from) a container registry isn’t too much of a pain once you’ve authenticated to the registry on your development machine and server, but I’m going to just rebuild the images on the server to keep things simple. This will also save us from having to make a separate docker-compose.yml file for our production environment.
Now, we need to get our application onto the server. One easy way, which I’ll use here, is just to make a public GitHub repository, push it from my development machine, and clone it to the server.
$ git clone https://github.com/timothyaveni/docker-express-example
$ cd docker-express-example/
We’ll need to set up our environment variables:
$ cp .env.example .env
$ vi .env # make edits as appropriate
And finally, since we’re running the web application straight on our host server, let’s update the host port in docker-compose.yml to port 80 (the standard HTTP traffic port):
...
  web:
    build: ./web-app
    ports:
      - '80:3000'
...
Our underlying server application is still binding to the container's port 3000, but Docker will bind to our host's port 80 and redirect traffic to this container. Now, let’s bring up the containers:
$ docker compose up --build --detach
Since we’re rebuilding the web container from scratch, this might take a while. In my case, the web server did need to be automatically restarted by Docker Compose, since the database wasn’t ready yet when it first tried (causing the app to crash).
Once the containers are up, we can access the website from the server’s public IP! For me, that was http://34.217.203.225/. Since I brought up the containers with --detach, I’m able to disconnect from SSH now, and the web site will be working just as it did when I ran it locally.
We can even try smacking that “reboot” button on the server. For a moment, this brings the web site down. Less than a minute later, though, my server has restarted and Docker Compose has brought my containers back up, persisted database and all.
Adding a domain name
Now would be a good time to hook up the new server to a domain name or subdomain, if you have one at the ready. If not, the cheapest domain names cost only a few dollars a year, and can be bought in lots of places. I use Namecheap (though this isn’t a strong recommendation, just where most of my domain names are registered), but you can also get them from Amazon, or through Cloudflare for pretty cheap.
For more complex configurations, configuring your domain name’s DNS records can get hairy, but our setup (a single server with a static IP address) is about as simple as it gets.
Your domain name provider probably offers DNS servers, which allow you to define a mapping from your domain name to a fixed IP address. Find the spot where your domain name provider lets you create DNS records (you might need to Google around for this), then add an A record for your Lightsail instance’s static IPv4 address (which you’ll find on your Lightsail instance’s dashboard).

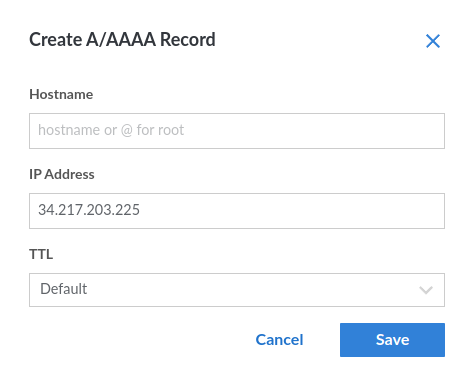
The “host” (or similar) field will refer to the subdomain of your domain that your Lightsail server will be accessible at, and it can contain nested subdomains (e.g. lightsail.research.example.com would probably use lightsail.research in the “host” field). You can set the TTL to whatever, but I tend to use the fastest value so that future updates will become visible more quickly.
You should do the same with your IPv6 address, which may use a separate AAAA record type or just share the A record type, depending on your DNS provider.
If your DNS provider supports wildcard records, consider setting one up now (which you may be able to do by sticking a * or a *.research or whatever in the “host” field). This will save you a configuration step in the future if you want to host other web applications on the same Lightsail instance.
New DNS records tend to be pretty quick to update these days, but you may need to wait (even as long as a few days, in the extreme) for a new domain or subdomain to work in your browser. You can try to speed up the process by looking up how to flush your DNS resolver cache on your operating system and/or web browser. Sometimes I’ve noticed that my phone on mobile data is quicker to update than my desktop is, so you can try that too.
In my case, I’ve set up http://lightsail-example.research.tja.io/ to point to my new Lightsail instance. I can hit the web server just as I did before.
In the next section, we’ll discuss how you can run multiple distinct web applications side-by-side using Caddy. Even if you don't have a second website to set up, Caddy makes it easy to configure HTTPS for your website, so I recommend giving it a shot.