Reverse proxying with Caddy
If you want to host multiple web applications on the same server, it's possible to just run them both at the same time. You can docker compose up in each folder, or even just throw them in the same docker-compose.yml file.
Since port 80 is the standard HTTP traffic port, a web server application should bind to port 80 on its computer to receive requests from web browsers. By “binding” to a port, an application tells the operating system that any external traffic received on that port should be routed to the application. But only one application can bind to port 80 at a time.
One way to deal with this is just to have each application bind to a different port, unblock those ports in any traffic firewalls you have on your server, and accept that your users will have to visit http://appA.com:3000/, http://appB.net:4000/, etc.
It's not enough just to have different domain names, because the domain names will both resolve to the same IP address if you want them both hosted on the same server. The incoming TCP/IP packets that the operating system is routing don't contain the appropriate metadata to determine which domain name was used to reach this machine, so if no port is specified, every packet will make it to whatever is bound on port 80, regardless of domain name or path. Our earlier example deployment will happily respond to any requests that come to the server, no matter which domain name is used.
Rather than requiring users to use a URL with an included port number, a typical solution is run a single application that binds to port 80 and serves as a "traffic cop", deciding where incoming HTTP requests should be routed. This is called a "reverse proxy".
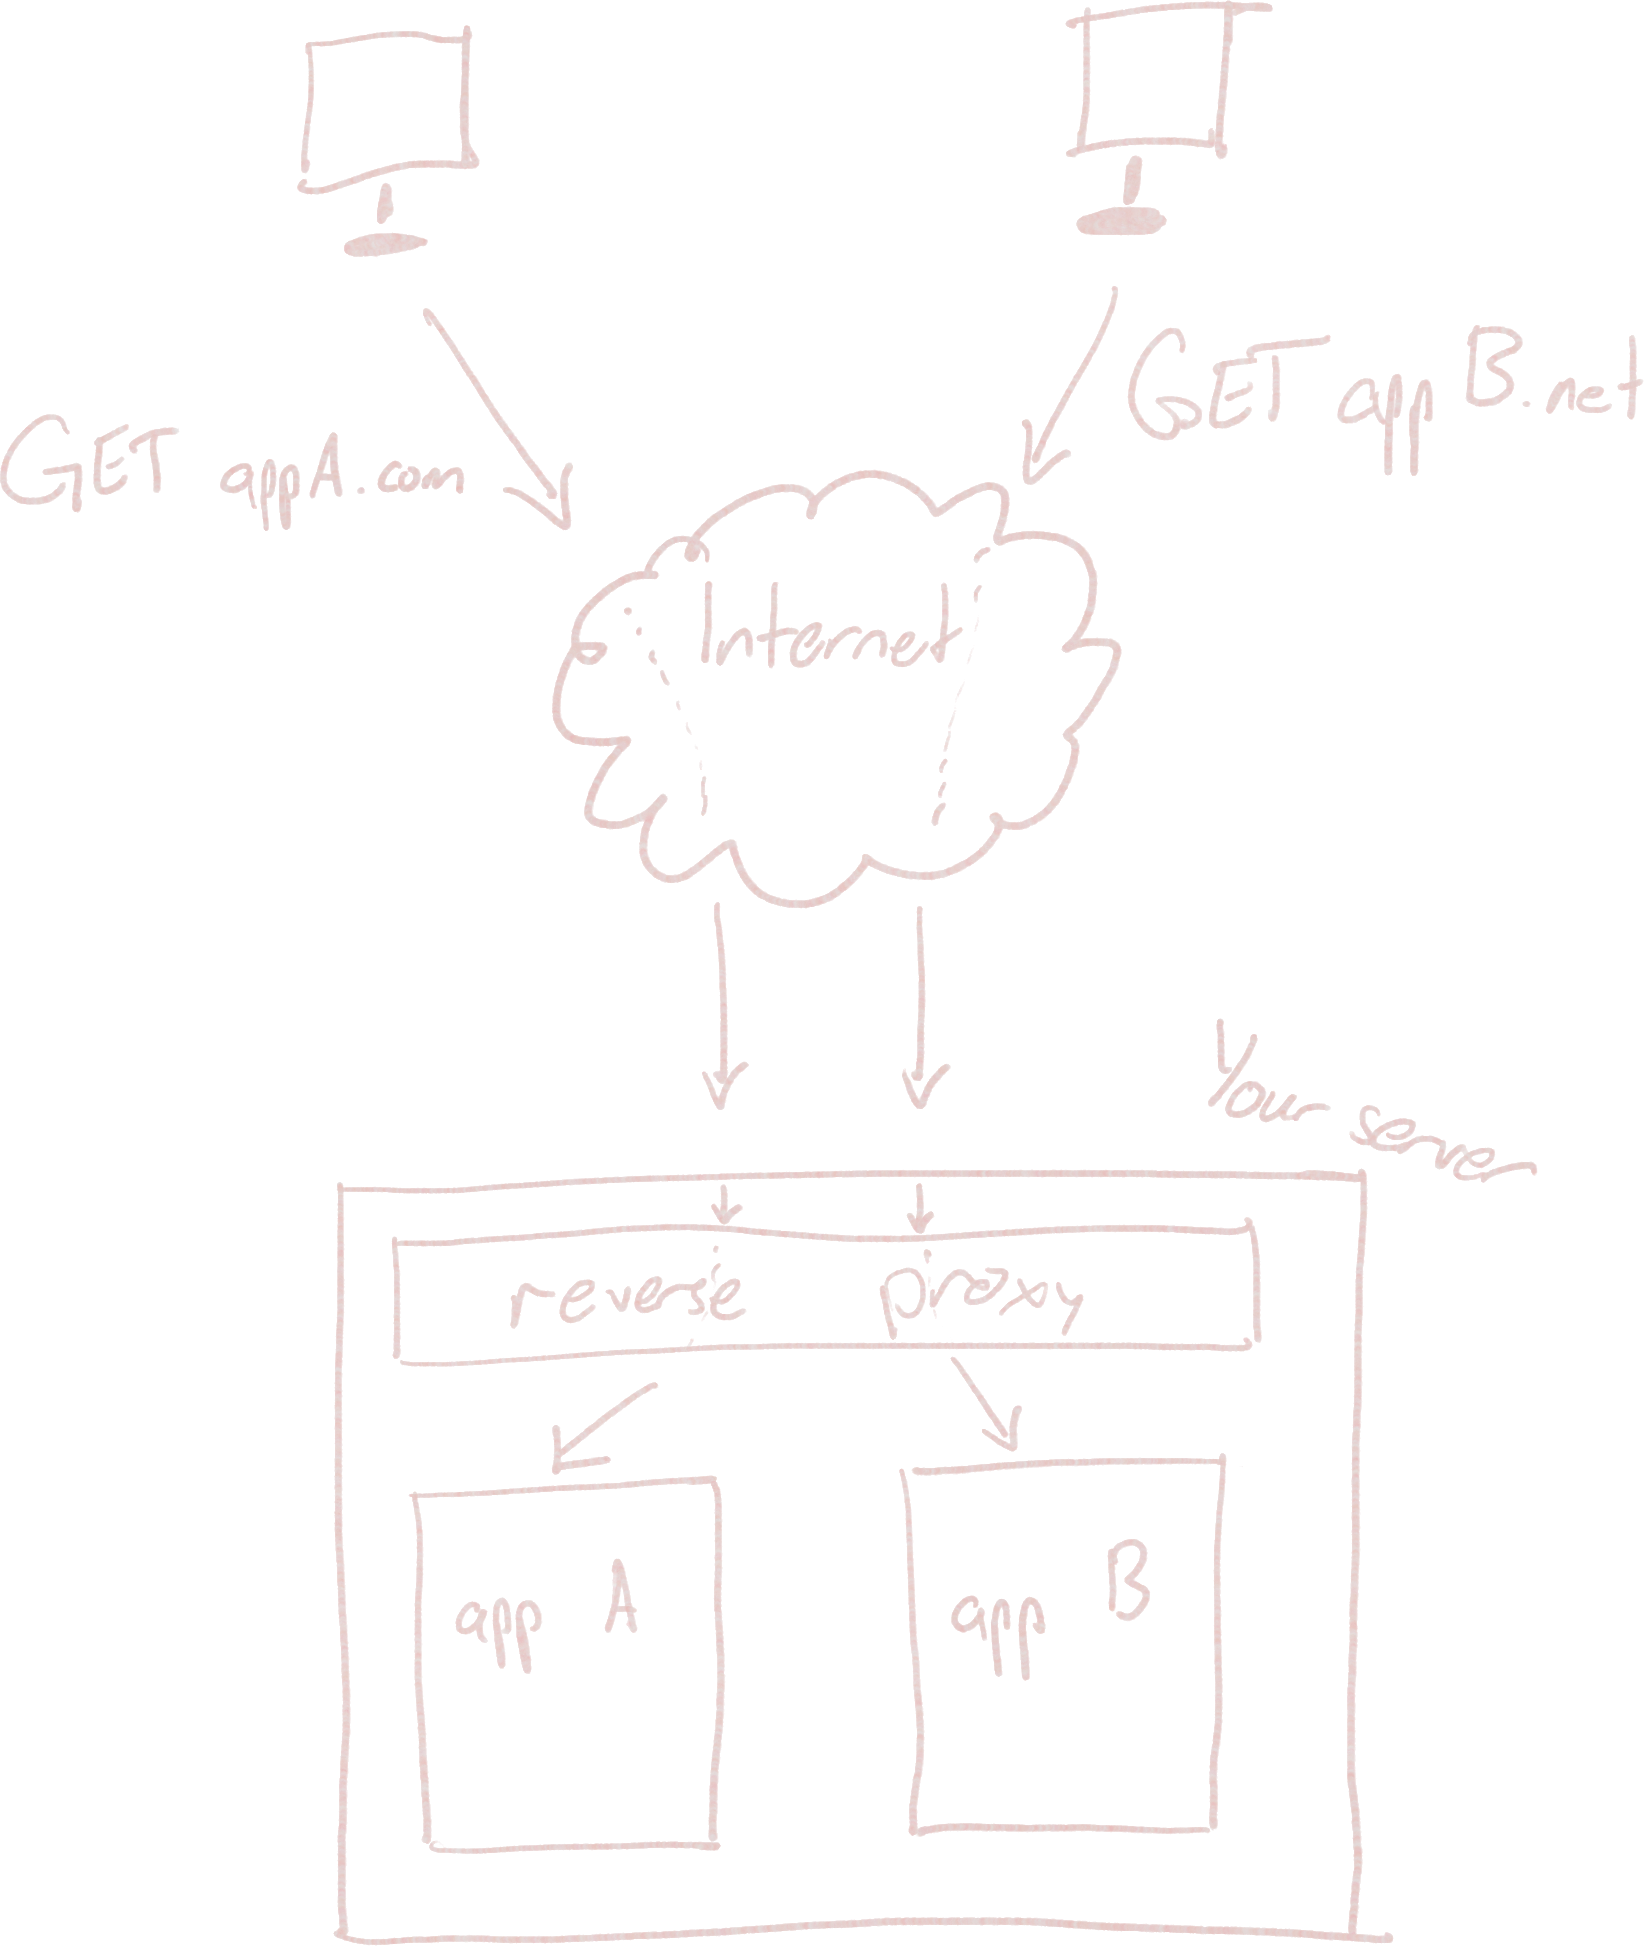
This way, you can host distinct web applications, even with totally different domain names, from the same server. Each one appears to be binding directly to the standard port 80, but your server is running a shim that acts as the first stop for all incoming web traffic.
This is all true for port 443 as well, by the way, which is the port that encrypted HTTPS traffic will use by default.
HTTP Reverse proxy applications inspect and alter HTTP requests to enable this multiplexing behavior, so they only work for web/HTTP servers. If you wanted to multiplex, say, your Minecraft server (to host two on the same machine, using the same port), you'd need some specialized solution for that particular type of traffic.
The reverse proxy needs to have some way to tell which app to route traffic to. Fortunately, since the reverse proxy is a web server, it knows how to read an HTTP request, which includes information about the URL requested by the user.
An HTTP request to http://www.banana-search.com/api/get-bananas would look something like this:
GET /api/get-bananas HTTP/1.1
Host: www.banana-search.com
...
By reading these first couple lines of an HTTP request, a reverse proxy can figure out the domain name and the path requested by the user. We can configure a reverse proxy server to use this information to decide where a request should go. The simplest configuration would be to direct traffic from different domain names (or at least different subdomains) to different applications:
banana-search.com {
  reverse_proxy [...]  # direct traffic to application 1
}

kumquat-search.com {
  reverse_proxy [...]  # direct traffic to application 2
}
But you can also imagine a more fine-grained configuration, like one that proxies to different applications depending on the requested path:
banana-search.com {
  reverse_proxy /api/* [...]  # API application
  reverse_proxy * [...]       # a different application
}
These are configuration examples for Caddy, a dead simple reverse proxy that we'll set up in a moment. Other options exist -- Nginx is probably the most popular, and what I use on my own crusty personal server that's been around since longer than Caddy has existed -- but Caddy comes with some wonderful features and simple configuration that will make our lives easier.
Where does traffic go?
How does Caddy (or some other reverse proxy software) actually send traffic to an application?
One easy way to do it is to have each application bind to a distinct port on the operating system (:3000, :4000, etc.) and just tell Caddy which ports to send traffic to. If we set up a firewall that doesn't allow external requests on these application-specific ports (as Lightsail does automatically), all incoming traffic will have to flow through Caddy.
For this to work, Caddy needs to be able to see the other applications' port bindings from the host machine's perspective. We'll still run Caddy in a Docker container to keep things clean, but we'll need to give it some extra networking permissions for this to work.
This isn't strictly necessary. We could set up a Docker network in our Docker Compose files that gives Caddy access to each container's internally-bound ports, without ever having to bind container ports to the host machine. This is a little cleaner, but the solution we use instead is... good enough, and I don't think adding additional complexity to your life is going to make you a happier person. We're casuals here. It's chill.
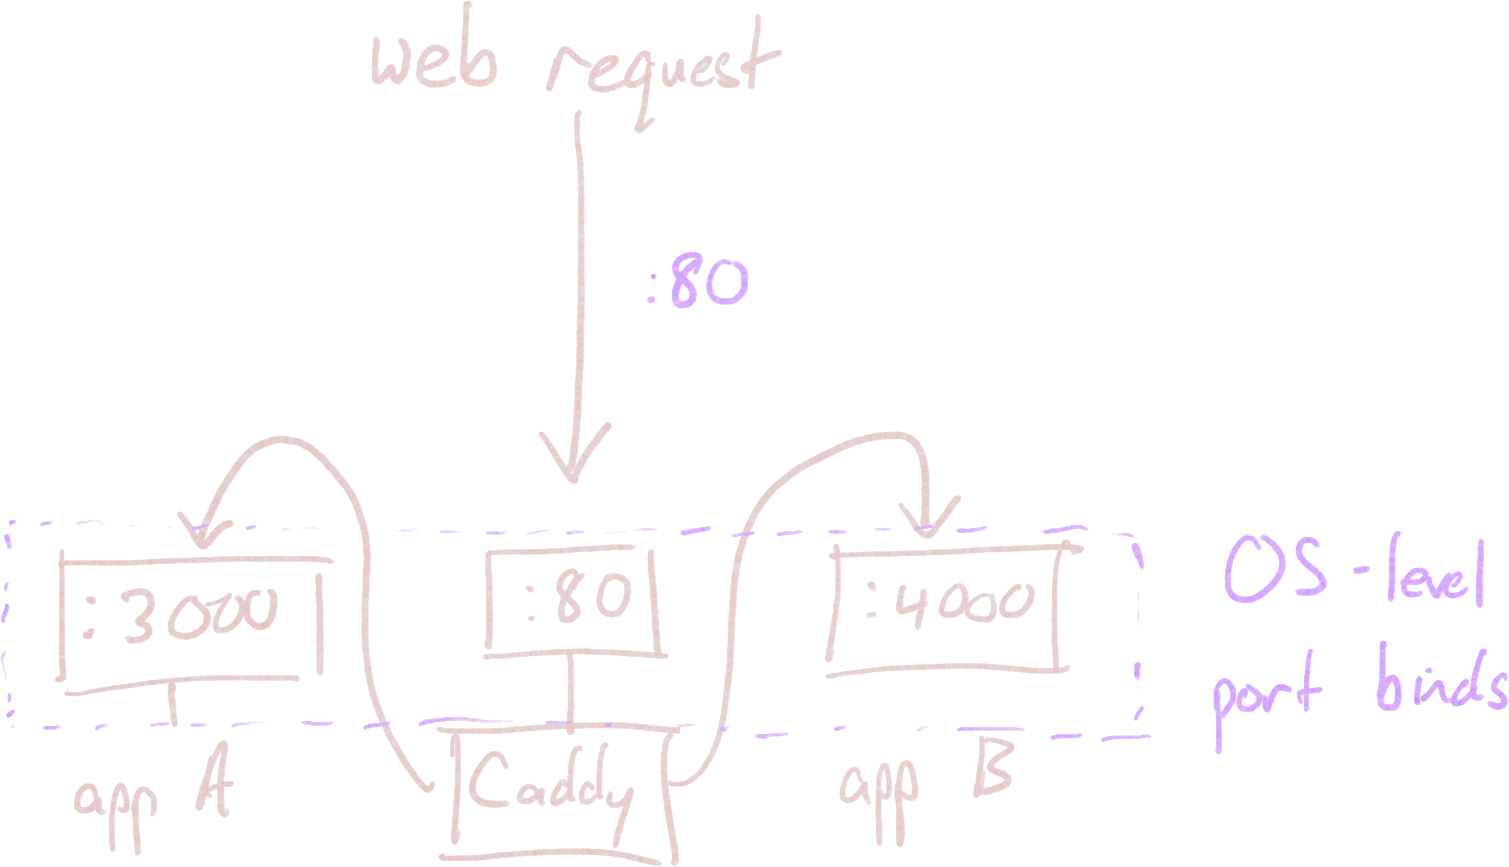
banana-search.com {
  reverse_proxy localhost:3000
}

kumquat-search.com {
  reverse_proxy localhost:4000
}
Working through an example
Okay, let's actually get this thing going. Here's what we're starting out with:
- A web server, up and running, with the page view counter application we installed earlier; in my case, hosted on Lightsail
- A domain name pointed to that web server. I'm using
view-counter.dock.guide. - A second application, running something completely different. I've built a Python web server that takes in two numbers and adds them together. You can read the code or clone it at https://github.com/timothyaveni/docker-add-example.
- A second domain name (or subdomain) for this new server. For me, that's
adder.dock.guide. This will point to the same IP address as our other domain.
First, let's undo the change we made earlier in docker-express-example that bound the page view counter directly to port 80. Instead, we'll switch back to binding to the host port 3000 in docker-compose.yml. Make sure to rerun docker compose up --detach to catch the new configuration.
But our second application also wants to bind to port 3000. It's allowed to do that inside the container, but we need to pick a different port on the host so they don't conflict. This is one of the awkward things about using our simple port-binding solution over the cleaner Docker network approach. I'll just switch the port bind in docker-add-example/docker-config.yml to 4000:3000 (remember the [host]:[container] syntax) so that we can access this service from the host on port 4000.
Now, I can docker compose up --detach inside the docker-add-example folder. Both web applications are running, but we won't be able to see either one, since we're binding to ports that are firewalled to outside users.
In comes Caddy. Fortunately, an official Docker image is provided, so we can use the tools we already had at our disposal. I'll make a new folder in our server's home directory called caddy and insert a docker-compose.yml file, not because we need to run Caddy alongside any other containers, but just because it makes it easier to run Caddy with the right configuration (and have it auto-restart when our system reboots).
version: '3.8'

services:
  caddy:
    image: caddy:latest
    restart: unless-stopped
    network_mode: host
    volumes:
      - ./caddy_data:/data
      - ./caddy_config:/config
      - ./Caddyfile:/etc/caddy/Caddyfile
Rather than explicitly binding port 80 (and port 443, for HTTPS), I've included the network_mode: host directive. This suppresses Docker's port mapping entirely for this container, giving Caddy the same network access as the host machine. This means that when Caddy chooses to bind to a port (like 80 or 443), the port will be bound directly. It also means that Caddy will be able to see the other containers whose ports have been bound on the host machine. If we used the fancier Docker networking route, Caddy would be able to see our other containers without this network_mode override; this is the "hackiness" sacrifice we made for simplicity.
The data and config binds are mentioned in Caddy's documentation as places where Caddy can store data it needs to save persistently. The Caddyfile will be where we specify how Caddy should access our server applications, and we can make a single-file mount the same way we did with folders.
caddy_config and caddy_data folders.)We can create that Caddyfile now in our caddy directory:
view-counter.dock.guide {
  reverse_proxy localhost:3000
}

adder.dock.guide {
  reverse_proxy localhost:4000
}
I normally don't --detach the first time I run something new, by the way. It's nice to be able to see the logs and Ctrl+C it when I realize I messed something up.
Now give it a docker compose up --detach! Once the Caddy server is running, you'll be able to access the individual services:
TLS termination
Since TLS certificates are bound to a domain name or subdomain, you won't get this behavior if you haven't set up a domain name. You can still get other value out of Caddy, though, e.g. by setting up different apps to run on different paths after your IP address in the URL.
You may notice that your applications are actually being served over HTTPS, not HTTP (and that http:// links redirect automatically to their secure counterparts). This may come as a surprise if you've ever spent time in the past wrangling HTTPS configurations. If not for the reverse proxy, your Python or Node/Express server would need to do some extra work to handle HTTPS requests, managing the request/response encryption and storing a certificate somewhere. In addition, web browsers typically only accept certificates issued by a certificate authority (like Let's Encrypt) after you've proven that you control a domain name.
Caddy handles all of this for you transparently. If you do indeed have the ability to serve traffic from a particular domain name (because you've configured that domain name's DNS to point to your server), and you have configured that domain name in your Caddyfile, the process of proving to Let's Encrypt that you own the domain name is automated for you, and the certificates are installed in Caddy's data directory.
When Caddy receives an HTTPS request, it terminates the encrypted request and forwards the raw HTTP version of the request on to your local web server application. When your server responds, Caddy will receive that unencrypted HTTP response and encrypt it before sending it back to the client. Your web server can effectively treat the interaction as though it's happening over HTTP, and Caddy will interact with the user's browser to handle the HTTPS traffic.